
How to install Accord's Salesforce App in your Salesforce instance
Summary
Understand what's happening in your connected Accord without leaving Salesforce. This article outlines how to install and setup the Accord CRM Card to your Salesforce Opportunity view.
Key takeaways
Installation Instructions
1. Ensure you have the right permissions
The Accord Salesforce App must be installed by any System Administrator.
Alternatively, a user with the Sales Profile and custom permissions enabled (listed below) can also install the app.
To install packages: Download App Exchange Packages
To configure installed packages: Customize Application
To assign licenses for a managed package: Manage Package Licenses
2. Install the Accord App
Click here to install the Accord App. You will be prompted to log in to your Salesforce organization. You will see the Install Accord prompt (as seen below). Choose Install for All Users and click Install.
Note: if installing the Accord application on your sandbox environment use the following URL format:
https://<MyDomainName>.lightning.force.com/packagingSetupUI/ipLanding.app?apvId=04t4W000002kf6M

For more instructions, please see Salesforce Documentation here.
Note: The Accord App is not yet listed in the AppExchange marketplace. You may see a related warning. Accord is SOC2 compliant and the Accord App is secure, functioning, and fully production-ready.
Setup Instructions

Horizontal view of an Opportunity with a connected Accord.

Vertical view of an Opportunity with a connected Accord.
Add the Accord Lightning Web Component to your Opportunity page layout
-
Go to an Opportunity
-
Click "edit page" using the menu in the top right

-
Drag and drop the Accord Lightning Web Component where you'd like it to live on the page
Last step: add your Accord workspace name to the Accord Lightning Web Component configuration sidebar.
Your workspace name is the subdomain of your workspace ULR (ie, the string of text between http:// and .inaccord.com in your workspace domain.
For example, the workspace name in the URL http://test-name77.inaccord.com is test-name77.
Do not enter: "sandbox", "inaccord.com", or "https://".
(Optional) Trusted URL
Some Salesforce instances have added security and to use the Accord Lightening component you will need to add your Accord workspace URL as a Trusted URL (see Salesforce documentation).
Your Accord URL is the main URL for your Accord workspace, for example: http://test-name77.inaccord.com
To add a Trusted URL, navigated to Setup, in the Quick Find box, enter Trusted URL, and then select Trusted URL. You do not need to add a port.
Be sure to select the three CSP directives (see below)

(Optional) Add the Accord Web Component to your custom objects
You can also add the Accord Lightning Web Component to pages displaying custom objects (as long as the custom object has an Opportunity relationship). This will display the Accord tied to the Opportunity on the custom object's name.
To do so, the Opportunity Id API Name property must be configured to point to the field that contains the Opportunity relationship. (See screenshots below)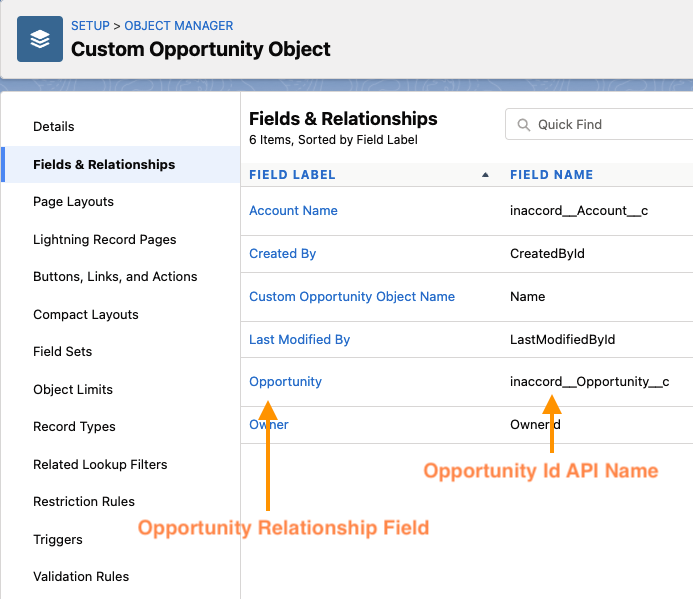
In this example, the Opportunity Relationship's field name is inaccord__Opportunity__c.
For Salesforce users to view the data presented in the lightning component, they must have an Accord license, and have logged into Accord from their browser at lease once.